Log in to your company's Timeplan and click on Salary periods in the left menu. Now you can choose to click on an existing salary-period or make a new one. To create a new period, press +New.

Give the salary-period a name (for example month and year) and then the from and to-dates. Click on the save-button to create the period. You have now created a date range for the current salary-period.

If you want the system to create salary-periods automatically you can put a check in the box beside Automatically create salary period. A new salary-period will automatically be created on the last day of each period. The start date will be the next day, and the length will be one month.

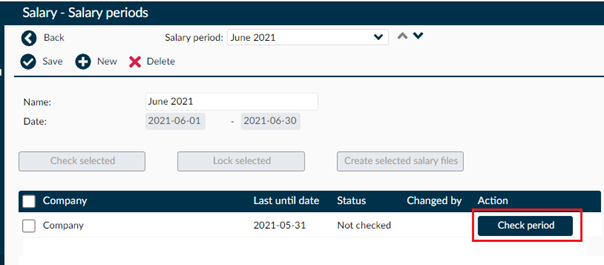
The next step is to check the period for any errors that might cause problems when running the salary-file into your external salary-system. Press the check- or check again-button to perform the control. As you can see below the period has been checked but not complete. If you click on the blue line you will get a report that tells you the errors and warnings that needs to be handled before you lock the salary period. It is possible to lock the period when you have errors and warnings left to handle. But if you do that - please note that those errors and warnings will not show in the salary-file and will thereby not follow in the file over to your salary-system.

If Timeplan does not find any errors and warnings in the salary-period, the status will change to checked and you will be given the option to lock the checked period.
Now it is time to create a salary-file. If you need to make any adjustments before the period is sent to payroll, you can unlock the file again. If you unlock it and make changes, you have to check the period again before you can re-lock it.
When you click on Lock salary-period a new button will show - Create salary-file.
After pressing Create Salary File, Timeplan will generate a zip file that will be saved in the location where your downloaded files are usually saved. The file contains one or several documents that you need to unzip or copy to your regular payroll file folder before you can upload them to your salary-system. If you need to make changes in the salary-period later, press Unlock Period and make the changes you need. When you are ready, you can check and lock again.
FAQ
- How do I delete salary-periods?
You can only delete salary-periods in chronological order because Timeplan assumes that the subsequent payroll files have been sent to the salary-system. The delete-option will appear to the right. Timeplan reads the date period for the salary-period and determines which salary-period you can delete or not. We never recommend deleting old periods as this can cause major problems. If you want to hide previous salaryperiods, you can do so by checking or unchecking Show All Salary Periods. - How to unpack a .zip file?
- The easiest way to process a zip file is to open it and either select all files and cut them (ctrl + x) or copy them (ctrl + c), then open the folder in which you save your payroll files and paste.
- Or you can open the zip file, mark all files and select Extract All/Extrahera Alla, then click on the folder where you want to save your files.
-
- Timeplan will generate a zip file containing your salary-files and the order in which they will be uploaded to payroll depends on your salary system. Contact your salary-system's support to find out what applies to your particular program.