
A demand template specifies which shifts are needed on a certain type of day and how many of each shift are required. When the template is applied to a date, the scheduling shows which shifts still lack staffing.
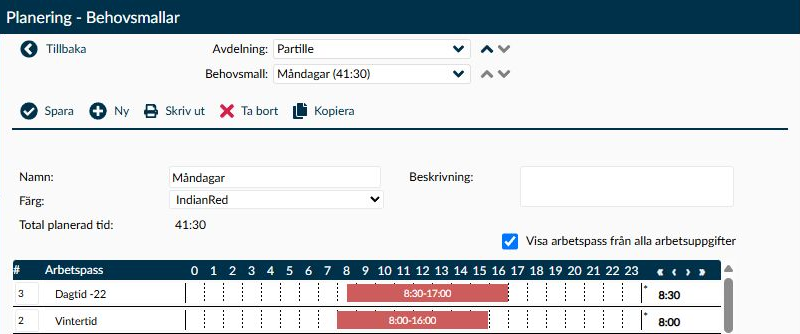
Image 1. The example shows the Monday demand template in the Partille department. You see the template's name and colour, the number of instances of each shift, and the timelines for the shifts. Total planned time is 41:30. The excerpt displays the top two shift rows.
Create separate templates when staffing patterns differ clearly, for example for weekdays, weekends, and high demand. Each template has a name, a colour, and at least one shift with a specified quantity.
Timeplan calculates the template’s total planned time based on the shifts’ estimated breaks. The template itself describes the demand; you select which days it should be used on the Demand Template Overview page. Demand templates can be used together with already scheduled shifts, for example shifts from a base roster.
- Description is the template’s name and may contain up to 50 characters. The name must be unique within the selected task or department. The same name can be used in a different task or department. Choose a name that helps the scheduler distinguish the template from other staffing patterns, for example weekday versus weekend.
- Colour makes the template easier to recognise in the calendar and planning views. Try to use colours consistently so that similar days can be identified.
- In the free-text explanation you describe when the template should be used, for example which demand level or opening hours it corresponds to. The text is optional and may contain up to 250 characters. This helps the next scheduler choose the correct template without the name having to include the full explanation.
Rows are retrieved from Shifts. The quantity on each row indicates how many copies of that shift are needed during the day.
- Enter an integer from 1 to 99 for a shift to include. For example, if you need three identical shifts, enter 3 on that row.
- An empty value or 0 means the shift is not included in the demand template. At least one row must have a quantity greater than 0 for the template to be saved.
- The total time accounts for both the number of shifts and their estimated breaks. The time updates when you change the quantities so you can check the demand before choosing Save.
Tick the checkbox Show shifts from all tasks when you need to add shifts from other active tasks you have access to. Check both the task and the shift times carefully, as the extended list can also include shifts from other companies you have permission for.
- When the template belongs to a task and a saved shift uses another task, the checkbox is ticked and locked. This helps you keep track of the shifts already included in the template.
- When the template instead belongs to a department, the checkbox is not locked in the same way. If you clear it, a saved shift may be hidden if all its parts lie outside the chosen department. A shift with some parts within the department can still be shown.
- A hidden row should not be interpreted as the shift lacking quantity or not being part of the template. Tick the checkbox again and check the entire content before considering saving any changes.
When you edit a saved demand template, open dates where it is used are updated from today onwards. When you delete the template, its assignments on future open dates and the unstaffed shifts created by the template disappear. Therefore, check where the template is used before choosing Save or Delete. Already staffed shifts and closed payroll period history are preserved.
If you have cleared Show shifts from all tasks saved rows may be hidden. Tick the checkbox again and check shifts and quantities. If you cannot see and verify the template’s entire content, refrain from saving and contact Timeplan support. Do not expect quantities on hidden rows to be retained when you save.
This section explains the buttons, dialog boxes and messages on the page that have conditions or consequences not immediately apparent from the interface.
Create the template for the task or department where the staffing need is to be used. Check the shifts’ quantities and total time before saving, so that the template describes the correct demand.
- Select the correct task or department and choose New.
- Enter a clear name, select a colour and describe when the template should be used.
- Enter the quantity for the shifts needed.
- Check the total planned time.
- Choose Save.
Copy creates an unsaved draft with the same colour, explanation and quantities. Timeplan adds text to the name indicating it is a copy, but the calendar days using the original are not copied. Give the copy a unique name and select Save only after the content has been adjusted.
When a demand template is deleted, its assignments on future open dates and the unstaffed shifts it created disappear. Shifts already assigned to employees and tasks in closed payroll periods are preserved.
Print shows the saved template and the number of shifts of each type. Printing does not change anything in the planning.
- The reusable shifts are created under Shifts. The demand template then specifies how many of these shifts are needed, not which employees will work them.
- Under Demand Template Overview you select which dates should use the template and the acceptable deviations in start time and duration. These limits affect which already scheduled shifts can cover the need, so choose them based on the staffing actually required by the operation.
- Timeplan first attempts to cover the demand with shifts that match the template exactly. Then it tries other shifts with the same times, and finally shifts within the permitted time deviations. Shifts for an employee absent that day are not considered coverage in this matching.
- If the demand is not covered, unstaffed shifts are created for the remainder. On Weekly Overview and Daily Overview you can then follow up the staffing. Using an existing shift to cover demand does not change the shift’s times.
First check which task or department you have selected and that the shift is still available among the available shift templates. Tick the checkbox Show shifts from all tasks when you want to see an available shift from another active task. The selection does not grant you access to tasks you lack permission for, but it may also show shifts from other companies you have access to.
If a previously saved shift disappears when you clear the checkbox in department mode, tick the checkbox again and check the entire template. Do not save a change if you are uncertain which shifts and quantities it contains.
Check that the template has a name up to 50 characters long, that a colour is selected, and that at least one shift has an integer between 1 and 99. The name must be unique within the selected task or department, and the free explanation can contain up to 250 characters.
Timeplan recalculates open dates where the template is used from today onwards. Unstaffed demands are updated, while assigned shifts and closed history are preserved.