
On the Base Schedule page, you build a recurring pattern of working days and days off. The same schedule can be used by several employees who start on different weeks in the pattern if they need to work in shifts.
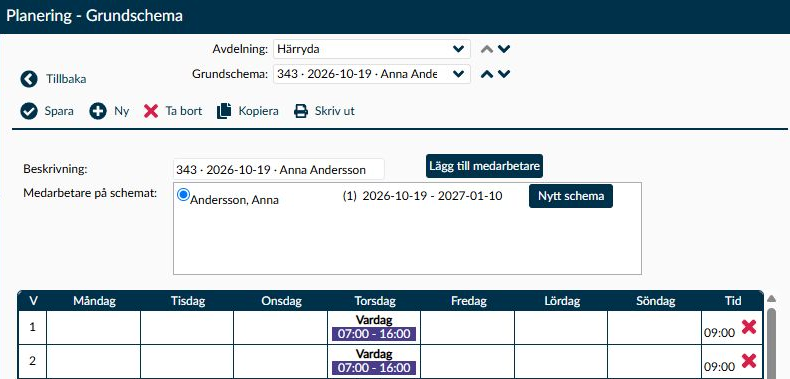
Image 1. The excerpt shows the first two weeks of Anna Andersson’s twelve-week schedule. Above the weeks is her assignment with start week 1 and the period 2026-10-19–2027-01-10. Verify the start week and dates together with the weekly pattern itself.
The base schedule is a template for one or more complete weeks. When an employee is linked to it, Timeplan uses the weekly pattern, start date, and start week to allocate shifts on specified calendar dates. The template and the allocated shifts are thus two different things: a manual change on a specific day does not necessarily change the base schedule itself.
Check the weekly pattern, assignment dates, and any absence choices before selecting Save on the page. The change can add, modify, or remove automatically created scheduling within the open period. Manual changes to shifts and absences are protected separately, not as a joint lock of the entire day.
The group change has a limitation in checking which employment contracts cover the period. Avoid this when contracts cover different parts of the new period. Even for an individual change, you need to review the new assignment's dates before proceeding.
Description is the name that helps you distinguish this schedule from others. It must contain between 1 and 50 characters. The weeks should together describe a complete recurring pattern, and at least one day must include a work shift before the schedule can be saved.
When creating a new base schedule, you can build up the weekly pattern in this order:
- Select New and verify that the correct Department is shown in the selector at the top of the page.
- Enter a name in Description. Select New week until the pattern contains the number of weeks to be repeated.
- If you have added one week too many, select the red cross at the far right of the extra week's row, under Time. Then check the order of the weeks before adding shifts.
- Each weekly row shows the time for that week. The total helps you assess the entire pattern, but note that breaks and part-time absences are calculated using the selected calculation employee's details if one exists.
- When you remove a week, the subsequent weeks move forward in the pattern. This affects how the pattern repeats, even if the remaining days have the same content. You cannot remove the last remaining week.
- If a shift continues past midnight, it must not overlap with the next schedule day's shift. Therefore, also check the following day's start time when modifying a night shift.
A schedule day can contain a work shift, full-day absence, and part-time absence. Shifts are sourced from the Work shifts page, while the rules for absence codes belong to the Deviation codes page.
When you copy a day, all its contents follow, including absence selections that may not be as obvious as the working time:
- Select the day whose content you want to copy.
- Hold down Ctrl or Alt while selecting another day.
- Check both the shift and the absence on the day you copied to.
If you select a day and press Delete, the day's shifts and absence choices are cleared. The change must then be saved on the page. An older, inactive task may still be visible in a saved schedule but is not a new choice when editing the day.
A shift consisting of several tasks must fit both your access rights and the contracts of the employees involved. Therefore, the same template may appear in one base schedule but be missing in another.
- To open the shift, you must have access to at least one of its tasks.
- If the shift is not yet used in the base schedule, contracts for employees currently or prospectively using the schedule are also checked. All relevant tasks must be allowed for them.
- A shift already in use remains an option even if the employees' current contracts would not permit adding it as a new shift. This does not guarantee that today's contract tasks still cover everything in the template.
- If no employees are assigned now or in the future, no such selection is made based on employee contracts. Check the tasks later when staffing the schedule.
For an employee to be assigned to the schedule, they must be active, belong to the current company, and be authorised to work on all tasks included. Also, verify that Employment contracts cover the period you want to plan.
- Start week is a week in the base schedule itself, not a calendar week number. Two employees can use the same two-week schedule but start in week 1 and week 2 respectively, enabling staggered shifts.
- From date must be after the last closed pay period and within the applicable employment contract. The date's weekday determines which day in the start week is used first.
- To date can be left blank only if the applicable employment contract also lacks an end date. If you enter an end date, it must be later than the start date and within the contract's validity.
Older and future assignments may remain in the list with a dimmed appearance. Therefore, check the dates when assessing which employees currently use the schedule.
Under Working time laws, checks are shown when applicable rules are active. The assessment is based partly on the selected employee, contract, and calculation date. This means the result should not be interpreted as the same assessment for everyone using the schedule.
Open a result to understand which days and which rule lie behind it. The checks cover activated rules for, for example, daily rest, weekly rest, night work, weekly working hours, and maximum scheduled time per day. They indicate deviations but do not change the scheduling for you.
This section explains buttons, dialog boxes, and messages that have conditions or consequences not immediately apparent in the interface.
Use the day dialog when a shift or recurring absence should be included in the pattern itself. An absence choice here follows the schedule, so ensure it should indeed recur and not only apply to a single calendar day.
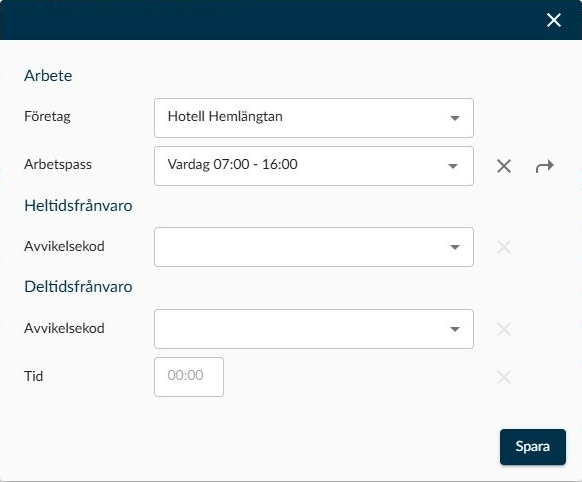
Image 2. In the day dialog, the shift choice is under Work. Full-time absence and Part-time absence each have their own choice for deviation code; for part-time absence, Time is also displayed.
- Double-click on the day.
- Select Work shift under Work and check any choices under Full-time absence and Part-time absence.
- Enter Time when the selected part-time absence requires a duration. If the extent is already determined by the absence rule, it is shown without allowing changes here.
- Select Save in the dialog.
- Check the modified day in the weekly pattern. Then select Save on the page when updating the entire base schedule.
The dialog's Save changes only the day in the template you are editing. The page's Save saves the whole template and orders updating of the affected employees' planning. The two buttons thus have different scope.
The base schedule must be saved before you link an employee to it. The dialog consists of selecting an employee and then choosing a period and start week. The list shows the employee's current base schedule, start week, and dates, so you can spot any existing assignment. If an employee is missing, check contracts, company, and tasks instead of randomly changing dates.
- Select Add employee on a saved base schedule.
- Mark the employee in the list and choose Select to open the period selection.
- Choose start week, From date, and if needed, To date.
- Review any information about an existing overlapping schedule. Confirm only if the new assignment should replace the existing schedule during the selected dates.
- Check the employee’s row, start week, and dates in the base schedule after assignment.
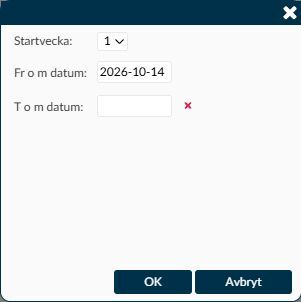
Image 3. After selecting an employee, enter the start week and assignment dates. Check both against the employee’s employment contract before confirming the assignment.
When confirming an overlap, the new assignment takes precedence during its period. The previous assignment can then be shortened, split in two parts, or removed entirely. If you choose Cancel in the confirmation, assignments and allocated shifts remain unchanged.
When an existing base schedule is saved, the planning that can still be recalculated is updated. Work begins after the template has been saved, so check the relevant dates before assuming the entire planning is complete.
- The update starts no earlier than the first open pay period and never before the employee's assignment date. It ends at the assignment's end date or at the limit you use for how far ahead base schedules are allocated.
- Manually added, changed, or removed shifts are protected from being replaced by the base schedule. Absence is handled separately: a manually changed shift does not automatically protect the day’s full- or part-time absence, and a separate absence change does not automatically protect the shift.
- If a shift also relates to a staffing need, the employee’s link can be removed while the unstaffed need shift remains. That the employee no longer works there does not mean the need itself disappears.
- The contract’s holiday rules and day profiles can cause a shift not to be allocated or to have shorter time than in the weekly pattern. Therefore, review the calendar date results, not just the template, when a holiday differs from a normal week.
- An interruption during the update can leave the already processed days updated while later days remain. The same applies when several employees are affected: a finished update for one employee does not mean all are ready. Check the dates where the result deviates before making further changes.
Copy creates a new base schedule with the same weeks and its own name. Employees’ assignments do not follow. Use the copy when you want to start from an existing pattern without simultaneously moving those who work according to the original.
If Timeplan blocks Remove because active employees use the schedule in an open pay period, you first need to check their assignments. An allowed removal deletes the schedule’s days and can also remove automatically allocated shifts within the open period. Already closed pay periods’ history remains unchanged. Do not use removal merely to hide a schedule that is still needed.
Print uses the selected calculation employee, or the first active assigned employee if none has been chosen. The choice matters because, for example, breaks affect the time shown. If there are unsaved changes, Timeplan warns that they will not be included in the printout. The print itself does not save your changes.
New schedule helps you start with a copy from a specified date. The old assignment ends the day before the new start date, and the employee is linked to the copy with their previous start week. New schedule for all creates a common copy for several employees; anyone who already has a later schedule assignment is excluded from the transition.
Check Start date for new schedule against the open pay period and the employee’s already planned assignments. After the transition, review both the end of the old schedule and the start of the new one. The update of allocated shifts then occurs for each employee.
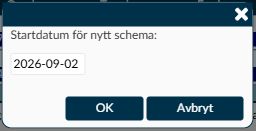
Image 4. The individual transition starts with Start date for new schedule. Check the date against the employee and the period the change will apply to.
The current check can accept an employment contract that starts only after the selected start date. Another contract can also affect the end date chosen. Therefore, a completed group change should not be interpreted as confirming the entire period is definitely covered by the right contract.
- Avoid the group change when employees’ contracts cover different parts of the new period. First, check each employee’s dates and allowed tasks.
- If you do the transition individually, you still need to review the new start and end dates. The individual workflow does not replace date verification.
- The message No employees on the base schedule can receive a new base schedule can appear even when the problem concerns only part of the group. Do not interpret it to mean all employees’ contracts are necessarily incorrect.
- On the Work shifts page, the shift templates you select for schedule days are managed. The template’s times and own rules follow when the shift is allocated.
- On the employee’s Base schedule and periods page, assignments are managed. You can monitor or change links if the wrong employee or period was selected.
- In the Weekly overview and Daily overview, you see the allocated shifts on calendar dates. This is where you need to check the result after a template change.
- The Advanced base schedule page provides a shared workspace for multiple schedules. It has a separate publishing flow and should not be confused with Save on this page.
If an assignment starts in a closed pay period and continues into the open period, editing of weeks and days is locked. This protects the link with the already closed period. Check the page message before trying to change the pattern.
When the schedule spans several employment contracts, Timeplan instead refers to Advanced base schedule or the employee’s Base schedule and periods. These pages have their own rules for how assignments may be changed.
Check that the employee is active, belongs to the current company, and is authorised to work on all tasks the schedule uses. Then review the contract’s start and end dates. An employee with the right tasks but improper contract coverage may still be missing as an option for the period.
If the shift is new in the base schedule, employees assigned now or later must have contracts covering all relevant tasks. Also, check your own access: you need to have rights to at least one of the tasks in the shift.
A shift already in use can still remain selectable. So the difference is not necessarily because you are looking in the wrong place; the rules differ between an existing shift and one being added for the first time.
The printout uses the last saved version. If you only saved one day in the dialog, the change is still only in the template you are editing. Therefore, review the entire change and choose the page’s Save if it should also apply to employees’ planning. Do not save a temporary draft just to include it in a printout.