
The Messages page in the toolbar is your inbox as an administrator. Here you read messages sent to you and send information to other administrators or employees. To follow up a message to a specific employee, use the Messages page under that person instead.
Open the page with the envelope icon in the navigation. The list shows your received messages, with the most recently sent at the top. You can open a message to read the full text, reply when there is a suitable recipient, and mark the message as unread if you need to return to it.
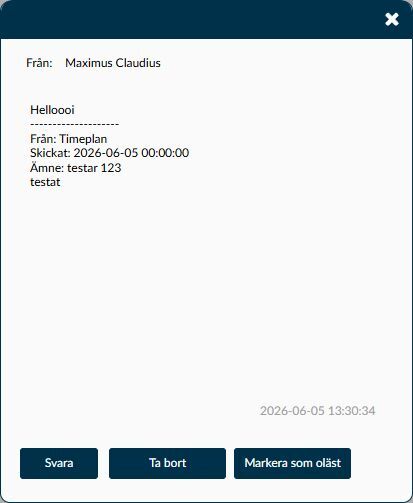
Image 1. An opened message dialogue with a test message. At the bottom are actions to reply, delete and mark as unread.
A dispatch to multiple recipient groups may have reached some recipients even if a later step fails. An error message therefore does not necessarily mean that no one has received the information.
The shortcut may leave the page you are working on without warning about unsaved changes.
There is no separate Sent view or Forward feature on this product page. Therefore, do not assume you can open a complete sent history here afterwards. To follow up a message to an employee, go to Messages under that person.
The list belongs to the administrator who is logged in. It is not a shared inbox for the company, nor is it the same list as the messages under an individual employee.
- An unread row is shown with bolder text. When you open the message, the read status changes already while the dialogue is being prepared. The status is therefore not proof that you have had time to see the entire text. The counter at the envelope reflects the saved status when the navigation refreshes.
- From helps you see who sent the information. Messages without an identified human sender may be shown with Timeplan as the sender. This does not mean there is a person to reply to.
- Received shows the time of the message. If several messages have the same timestamp, their relative order may vary.
- The list shows only the start of long subjects and message texts. Open the row to read the full content before deciding what you need to do.
- An expired message may still remain in the administrator's inbox and count as unread. Therefore, the counter is not a reliable measure of how much current information is waiting.
Choose recipients based on who needs the information. There is a difference between selecting a named employee and selecting a task as a group.
- Administrators are used for messages to other administrators. The selection normally belongs to the current company. When working from the head office, the administrator selection covers the entire organisation.
- Employees are used when you want to select persons directly. Here you see employees who have an active employment contract in the current company and whose primary task you have access to. Having access to another of the person's tasks does not always mean that the person is offered here.
- Employees at is used to select tasks whose employees should receive the information. Review the group selection as carefully as a person selection; a task may reach more people than those you have in mind.
- In the head office context, the company's employee and task selection is not shown. Switch to the correct company if the dispatch is to be directed to employees there.
- Always double-check the recipients before sending. That a recipient was included when you opened the dialogue is no guarantee that all information and access remain unchanged.
You can combine recipient groups in the same dispatch. If an employee is selected both directly and through one or more tasks, the employee receives one copy, not a copy for each such choice. Administrator accounts and employees are handled as separate recipient types. Do not assume that two such accounts are automatically merged just because they belong to the same person.
The task list may show active tasks in the company even outside your usual task selection. Only choose groups you are responsible for informing; the list content in itself is not a notice that the dispatch is appropriate or approved.
Write a subject that makes it easy to understand what the information concerns and a text that can be read also in the app or at clocking, without the recipient seeing the page you are working on.
- Subject allows a maximum of 50 characters. A short subject that describes the matter is more useful than a generic heading that just says "Information".
- The message text allows a maximum of 1,000 characters. In the current dialogue, the larger text field may lack the heading Message. It is still where you write the actual information.
- Both subject and text must not be left empty. Use the character counters and read through the entire text before dispatch, as an overly long text may otherwise be truncated.
- Use plain text and clear web addresses. Do not paste in HTML code to try to format the message; it may be interpreted differently than you intend when the recipient opens the text.
The Valid until field indicates the validity date of the message. Both a new message and a reply suggest a date seven days ahead. Always check the suggestion in relation to the information you are sending.
- Specify a valid date. Do not leave the field empty or use a past date for new information. The current dialogue does not securely catch all incorrect dates, and an invalid value may cause an error during sending.
- For the administrator's inbox, the date does not reliably prevent an old message from continuing to be shown and counted. Therefore, do not use the validity date as a way to withdraw information.
- For employees, the last day is treated differently depending on where the message is shown. The app and the older clock terminal may display the message throughout the expiry day, while TimeClock and the personnel view may consider it expired as soon as that day begins. If the information is time-critical, you need to check the channel used by the recipient.
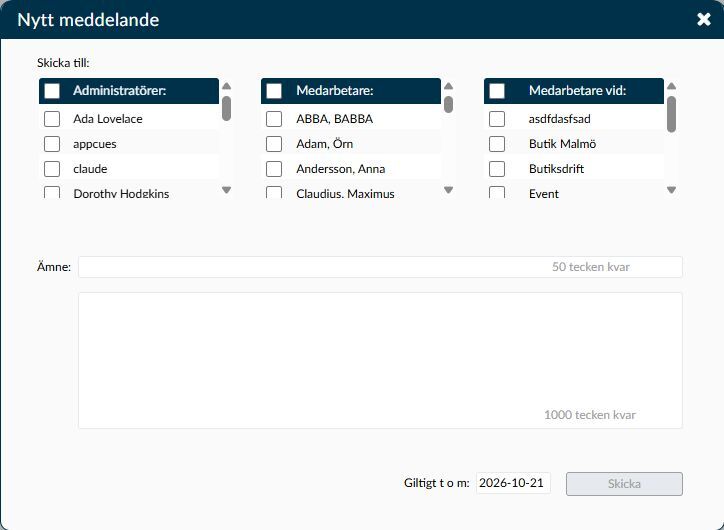
Image 2. In the New Message dialogue, you can select administrators, employees and employees at a task. Check selection, subject, text and validity date before sending.
- Open the Messages page and choose New.
- Mark the administrators, employees or tasks to be reached. Ensure you are working in the correct company.
- Write the subject and message text. Read them as if you were the recipient, without access to other background information.
- Check Valid until and adjust the date if needed.
- Review recipients and content one last time. Choose Send when the information is ready to be sent.
- If an error occurs, investigate what has already been sent before trying again. For an employee, you can follow up the message under Personnel – Messages.
A sent message to an employee can appear in the app and in the clocking channels the employee uses. This does not mean the person has already read or understood the content.
Open a row in the inbox to read the full subject and message. Check the sender, time and any links before acting on the information.
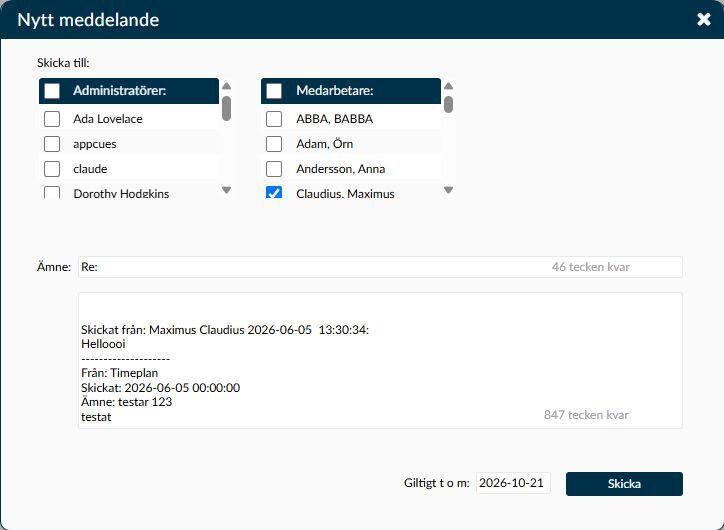
Image 3. When you choose Reply, the New Message dialogue opens with a suggested recipient and previous message text. Check both before writing and sending your reply.
- Reply opens the same dialogue with the heading New Message, but with details from the message you are replying to. Timeplan tries to select the sender in the recipient list. If the person is not there, no recipient is automatically selected. Always check the recipient, especially when the sender is indicated as Timeplan. The Employees at selection does not appear when you reply.
- Up to the first 800 characters of the previous message text are copied to the editable reply field. Information about the sender and time is included, and all this counts towards the 1,000 character limit along with what you write yourself. Read through the copied text and add the background needed; a long previous conversation does not follow in full.
- The subject is prefixed with Re: even if it already starts with that. Shorten or correct the subject before sending if the character counter shows a negative number. Otherwise, the end of the subject may be truncated when saved.
- Mark as unread makes it easier to find the message again. This action affects your read status; it does not resend the information.
- Closing the dialogue does not automatically mark the message as unread again. Use the specific function if that is what you want to achieve.
Choose the scope before clearing. Simply closing the reading and deleting the message are different actions.
- Delete in the opened message applies to the message you are looking at.
- Delete read applies to messages marked as read. Keep them if you still need the information; read does not necessarily mean fully processed.
- Delete all covers your entire inbox, including messages you have not read.
Clearing your own inbox is not a way to recall a dispatch from other recipients. Do not confuse this with deletion on the Messages page under an employee. There the action applies to the message for the selected person and can remove it from the person's app and clocking channels.
Automatic messages opens the page where recurring messages are set up, for example messages triggered by a specific event. The shortcut requires the Personnel & Administration module and access to that page. The regular Messages page in the toolbar is included in Timeplan Basic. Therefore, the absence of the shortcut does not mean the entire message function requires the same add-on.
Read Automatic messages if the information is to be sent repeatedly. A manual message you write here is not automatically such a template.
On the Messages under Personnel page, you see messages directed to the selected employee. This can help you follow up a dispatch, but the page is not a complete sent history for you as an administrator.
Be careful when opening an existing message there to change it. Save can restore confirmation status and send a new notification. Do not save just to check that the message exists.
Tasks are used for group selection, while Administrators and their access affect which people are available for dispatch.
An employee’s Confirmed status should not always be interpreted as the person having expressly acknowledged or understood the text. The app, TimeClock and the older clock terminal register confirmation at different events. Follow up important information with the employee if you need to know it has been understood.
This administrator page has no separate Sent view. For a message to a specific employee, you can open Messages under that person. You see the recipient’s message there, not an independent copy in your own sent history.
The administrator’s inbox and counter may still include a message after the expiry date. Open the message and assess whether the information is still relevant. Mark or clear based on what you need to keep, not just the number by the envelope.
The current reply field includes only a limited part of the previous text. It also becomes editable. Read through the reply and add the background needed; do not assume the recipient automatically gets a full history.
Check recipient selection, text length and validity date. Then investigate if any recipients have already received the message before sending again. A new attempt may otherwise send duplicates.
You can follow the message’s status on the Messages page under the employee. The status shows what the used channel has registered but is not always proof that the person has actively read and acknowledged the text. See the article’s explanation of the confirmation status before using it as a basis for follow-up.