
On the Publish Work Shifts page, you determine up to which date employees will see their scheduled work shifts in the app. This helps you make a finished part of the schedule available while you continue planning further ahead.
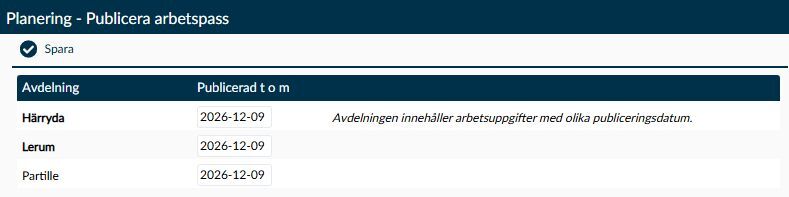
Image 1. The example shows publishing grouped by department rows. The information on the right alerts you that the tasks have different saved dates; the department row’s date therefore needs to be checked along with these details.
When a longer period is fully planned, you can specify a fixed end date for the publishing. The shifts are already in the schedule; this only changes their visibility to employees. In other words, you do not create new work shifts or change shift times by publishing them.
You either work with one row per task or with shared rows for departments. Which grouping you use determines which tasks a date on the row covers.
A date on the page may have been increased up to the automatic publishing limit without the saved date changing. When you choose Save, a row that looks unchanged may also receive a new saved date. On a department row, the same action can replace several tasks’ different dates and even shorten a publishing period that previously extended further ahead. Read the information about individual tasks before saving; do not use Save just to check the page.
Published until indicates the last date the work shifts are published to. To understand the date, you need to distinguish between the automatic publishing and a date you have entered yourself:
- Automatic publishing makes the shifts visible for the number of weeks ahead set in Timeplan. On this page, the earliest publishing limit is always at least one week from today's date, even if the setting is zero. The limit moves forward day by day, so you don’t have to manually update the date every morning.
- If you specify a later date, that date remains fixed. When automatic publishing eventually catches up, it continues to move the limit forward.
- A saved date for a task is displayed in bold text when it is later than the automatic limit. This helps you see that the task has been published further ahead.
- If you leave the field empty and choose Save, the current automatic limit is used. An empty field does not mean all publishing is turned off.
- The calendar lets you select a date from the automatic limit onward. If you type an earlier date yourself and leave the field while the calendar is closed, the date field changes it to the limit. Therefore, check the date that actually remains, not just the one you typed.
- If you enter an invalid date and leave the field while the calendar is closed, the field reverts to its previous date. A reset value does not mean your intended date was accepted. Check the format and the visible date before choosing Save. If an error is shown when saving, you need to return to the page and check the values; do not expect the incorrect entry to remain for correction.
When the page shows tasks, each date applies to the task on that row. You see the active tasks in the selected company that you have access to.
If the page instead shows departments, each row groups several tasks. It is then important to read the date as a summary:
- The department row summarises several saved dates, but the current calculation does not always provide the earliest date when more than two tasks are included or a date is empty. Therefore, do not use the row’s date as a definite indication of how far each task is published.
- When dates differ, The department contains tasks with different publishing dates. Hover your cursor over the information to read the tasks’ saved dates. These tasks are not increased to the automatic limit. A dash means the task lacks its own saved date, not that its shifts are never published.
- When a new date is saved for a department row, its active tasks that you have access to receive the joint date. Inactive tasks and tasks you do not have access to are not changed by this action. Check especially if any task already has a later date that you want to keep.
- A department row labelled No access rights cannot be changed. The visible information and its dates may still include tasks not within your editing scope. Seeing a name or date there therefore does not mean you have the right to edit the task.
This section explains how to select a date and what Save means when you change the publishing for a task or an entire department.
Open the date field on the row you want to work with. The calendar helps you choose a valid day without typing the date yourself.
- Select the correct month and year in the calendar's selector, or use its arrows to browse.
- Select the day that should be the last published day. Days before the automatic publishing limit cannot be chosen in the calendar.
- Check the date now shown in the field. The calendar’s choice changes the field, but you still need to click Save to apply the publishing. Read first the warning about rows that appear unchanged.
If you want to leave the calendar without choosing a day, you can select another part of the page, such as the page heading. The calendar then closes without changing the publishing date.
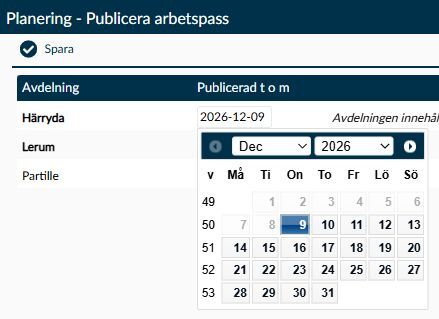
Image 2. The detail shows the date field’s calendar. Days before 9 December are not selectable in this example. The information in the second table column is shown in the main image; here the focus is on choosing a date.
When the schedule is ready further ahead, you can publish the finished period. First check if the row relates to a task or a department, so that you know which shifts are affected.
- Enter the desired end date under Published until on the rows to be changed.
- Check the dates on all available rows, including those you have not changed. If a department contains different publishing dates, you need to decide if the active tasks you have access to should really share the same date.
- Choose Save.
- Check in the app that an employee with the relevant task sees their planned shifts up to the intended date.
Keep the following in mind when saving:
- Timeplan compares the date in the field with the underlying date, not just what appeared changed on the screen. When the saved date is older than the automatic limit, a visually unchanged row may still be updated. For a department row, the update covers the active tasks you have access to.
- A department row with different dates is not always evened out just because you select Save. The result depends on which underlying group date is compared with the field’s value. If you need to keep different publishing periods, check the individual tasks and consult the Timeplan administrator before saving a common date.
- Publishing makes the already planned shifts visible up to the date. It does not create, move or delete any work shifts.
- If a shift is missing from the schedule, moving the publishing date will not help. The schedule itself needs to be checked.
In System Settings there is Automatically publish work shifts forward in time (weeks). This indicates how many weeks ahead work shifts are published automatically and applies to your Timeplan environment. A later date on the Publish Work Shifts page is used when a task needs to be published further ahead than the shared limit.
The settings are located under Administration → System Settings → Planning. The setting Use departments determines how the publishing page is grouped:
- With Yes, shared department rows are shown.
- With No or Yes, but plan/filter/group by task, tasks are shown individually. The latter choice uses departments otherwise but does not group this page by department.
The tasks themselves and their department membership are managed on the Task page, while departments are managed on the Department page. The publishing page does not change that grouping.
The publishing date determines how far ahead employees see scheduled work shifts in the app. A shift after the date still remains in the administrator’s schedule, for example in Weekly Overview and Daily Overview, even if the employee does not yet see it as published.
The base schedule is a separate view. If Allow employees access to the base schedule in calendar view is set to Yes in System Settings, the base schedule is displayed in the app’s calendar after the published days. This does not mean the planned work shifts have been published further ahead.
Start by comparing the shift’s date with the task’s Published until. If the shift is later, it is not yet published for the employee.
Also check that the shift belongs to the correct employee and task. If the page shows a department row with information about different dates, you need to read the individual tasks’ data along with the automatic publishing limit. The row’s date is not a reliable summary of the earliest publishing.
Each task has its own publishing date, even when the page shows them grouped in a department. The information about different dates helps you discover that some tasks have been published further ahead than others.
Hover your cursor over the information to compare the saved dates. If you want to keep the differences, do not enter a new joint date on the department row. Also be aware that Save can update a row that looks unchanged when its underlying date is before the automatic limit. Then a later date for another task may be replaced. Therefore, check the entire department’s publishing before saving, not just the row you just edited.
No, a date you have entered yourself remains fixed. It is the automatic publishing limit that moves forward each day.
You do not need to reset the manual date when automatic publishing catches up. After that, it is the automatic limit that determines how far ahead the shifts are published.
The base schedule appears after the published days when Allow employees access to the base schedule in calendar view is set to Yes in System Settings. If you wonder why the calendar shows further ahead than the publishing date, this is the setting you need to check.
Distinguish therefore between the calendar’s base schedule and the planned work shifts that have been published. Seeing the base schedule further ahead is not itself a sign that the publishing date is incorrect.