
On the Day Overview page, you can see how a single day is staffed, with shifts placed on a timeline. You can compare times, see where staffing needs reinforcement, and adjust shifts or breaks. Review the changes in the workspace and save once the day's planning is as you want it.
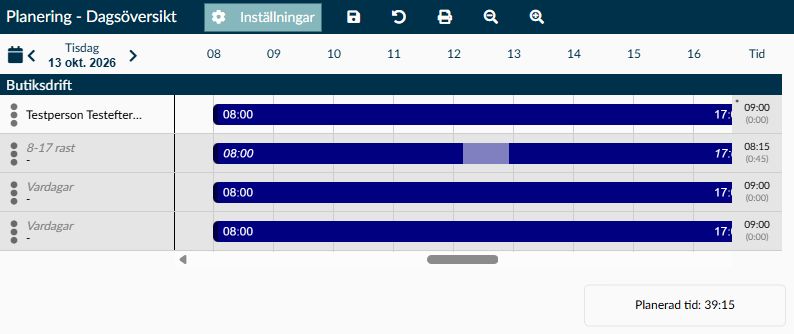
Image 1. The section shows the planning for the selected day and work task. A break is marked in the second shift row. The timeline shows the part of the day visible in the view; you review the full interval times in the Shift dialog. The sidebar tabs and shift templates are explained in the text below.
The timeline groups the planning by the work tasks you have selected. The placement of the shifts shows when work starts and ends. This makes it easier to see whether several employees are working at the same time, if a need lacks staffing, or if breaks need to be scheduled at different times.
To the right are two tabs with different purposes. Under Employees you will find people who may be relevant for staffing. Under Shifts there are reusable shift templates that can be added to the day. A selection in the workspace is not the same as creating a new template on the Shifts page.
The sidebar starts with the Shifts tab. If you want to examine which employees are available instead, choose the Employees tab. Changing the tab only changes what the panel displays; it does not assign any shifts.
The page distinguishes between display choices and changes in the planning. Work tasks, sorting, absence display, and zoom affect what you see. Assigning an employee, changing a shift, or removing something affects the day's planning and must be handled with Save or Reset.
The Print function first saves any pending planning changes and then starts the report. Do not use it as a preview if you wish to leave changes unsaved. Review the workspace before choosing to print.
Changing the selected work tasks reloads the planning without the same prompt as when changing the date. Unsaved planning changes may then be lost. Save what you want to keep before changing the selection, or choose Reset if you want to discard the changes.
- Work tasks determine which parts of the business you work with in the view. When the selection changes, the timeline, employees, and shift templates update without a separate Show button. Therefore, check your selection first if a shift or employee seems missing.
- Sort by offers Employees, Shift name, and Shift start time. Sorting by start time helps you follow how staffing builds up during the day, for example. Sorting does not change times in shifts.
- Show employees with absence determines whether absent employees are included in the overview. Check how this option is set when you open the page. If you deactivate it, rows in the view are hidden and the total sum may change, but absences are not removed.
- Timeplan remembers these display choices and zoom level for the next session. The page can also return to your last used date. Therefore, check the date before you start changing the planning, even when reopening the page.
- The date field and arrows are used to select the day you want to work with. The arrows move one day at a time.
- Zoom in makes it easier to work with short intervals and break placement. Zoom out gives an overview of the day. Zooming only changes the timeline scale, not the times of shifts.
- When you drag a permitted start or end point, the time displayed by the cursor helps you see which time the change corresponds to. Verify the displayed time before releasing.
- If you change the date or leave the page with pending changes, you will be asked whether to discard them. Cancel the change if you want to stay and review the changes first.
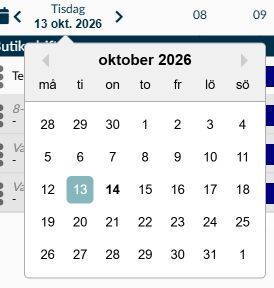
Image 2. The example shows 13 October as the selected planning day. The calendar arrows are used to scroll between months; opening the calendar does not change the day in the workspace.
Only available is selected at the start. Deselect it when you need to understand why someone is missing from the first list, not as a way to circumvent a barrier to assignment.
- Available collects the employees who are deemed available based on the loaded data. Existing shifts, whole-day absence, and negative work requests affect the list. Placement here is a tool when choosing staffing, not a guarantee that every conceivable shift suits the employee.
- The list prioritises positive work requests. After that, factors such as lower time bank balance, higher weekly working time, and names are used. The order is thus not purely alphabetical.
- Unavailable is shown when you include more than the available. Negative work requests and absence affect grouping and order. Investigate the reason before attempting to staff with the person.
- The information box Already scheduled shows that an employee has planning for the day. It is an indicator next to the symbol, not a separate third group in the list. Check the person’s times before assessing whether additional work is possible.
- Work task not loaded means the employee’s work task is not included in the currently loaded selection. Start by checking the view’s work tasks, not by changing the employee’s employment contract.
- The employee row also shows weekly working time and time bank balance. A dash by the time bank may mean zero or that no balance is available to display; it does not mean the employee has time credit. Hover over the work request symbol if you need to read a comment related to the response.
This tab displays shift templates for the work tasks included in the selection. Name, abbreviation, and times help you choose the correct template before adding it to the day.
- Check the entire shift if the template contains multiple time intervals or work tasks. A familiar name does not necessarily mean all parts belong to the same work task.
- When a template is added, a shift is created in today’s planning. This is a different action than changing the reusable template on the Shifts page.
- If the correct template is missing, first check your work task selection. If the template itself needs to be supplemented, do so on the Shifts page, where the change may have consequences for other future planning.
A manually specified break may be shown as a separate marker in the shift. When the marker is visible and editable, you can position it within the shift boundaries. It is the break marker that moves when you want to change just the break placement, not the entire shift. If you move the whole shift, the break moves with it.
- Hover over the shift to see Planned time, Break, and the break’s available times. Manually set break indicates a break length has been manually specified, even when the selection is zero. The text thus does not prove that the break has been moved.
- A break calculated according to contract can be deducted from the time without a movable marker being visible. The marker may also be hidden when the shift is narrow in the view. Check the break data and zoom in before concluding that the break is missing.
- For a staffed shift, the break calculation primarily follows the employee’s contract. When an employee is not assigned, a chosen collective agreement or the shift template’s break basis may be used. Therefore, verify both length and placement if the break changes when staffing the shift.
- Directly adjacent intervals can be counted together in break calculation. A manually chosen break length must also meet the contract’s limits for manual breaks; otherwise, the calculated break may be zero. Check the break actually shown in the time data, not just the choice you made in the dialog.
- A break must fit within the shift. Check the break marker again after you have changed the shift’s start or end time.
- The Time column shows the row’s planned time after break, with the break length in parentheses. Totals also update with changes not yet saved.
- The shift type setting Planned and actually worked time determines whether the interval counts in the sum. Both Regular and Extended are included in the Day Overview’s total. With None, the interval contributes neither its length nor its break. For example, an eight-hour shift included with a 30-minute break shows 7 hours 30 minutes planned time. These shared settings are handled on the Shift types page, not by changing the day’s times.
- Planned time at the bottom sums the displayed rows. If a row contains multiple work tasks, time for a work task outside your selection can also be included. Check the entire row and absence display before using the total as a measure for a single work task.
- A whole shift row waiting for deletion can still be included in the total. Check the result again when the saved planning has been reloaded. Time after midnight also belongs to the shift’s planning day and is not automatically split into two day totals here.
- Own changes helps you see that the shift has a particular choice, such as a changed shift type, manually specified break, or an explicit choice for meal deduction or collective agreement. Read the details before comparing the shift with its template.
- Comment is shown when the interval has a comment. It can explain an exception not evident from the times. Change it in the Shift dialog if needed.
- The absence row shows a deviation code. Use this information to understand why an employee should not be counted as available; hiding the absence in the view does not change assignment conditions.
- The base schedule symbol shows that a shift comes from a recurring schedule. This helps you distinguish base planning from extra shifts added for the day.
- An interval marked Need template describes a staffing need. Unfulfilled needs must be compared to the actual staffing, not just the number of rows in the view.
- The connection between shift and need is created based on the need template and the matching rules in planning. The marker on the timeline then compares whether the shift row’s time interval covers the need’s time. Two meeting intervals can cover the time together, while a gap leaves part uncovered.
- A visually fulfilled need does not itself confirm that the right employee is assigned or that breaks and work tasks provide correct actual staffing. Review staffing even when the need marker looks satisfied.
- A need template shift may not be removed directly here. The message Cannot remove a need template shift shows that you need to investigate the need and its connection rather than trying to delete the row again.
Here the functions that change the planning and what you need to check before saving are explained.
- Save is used to implement pending planning changes in the workspace. Review assignments, times, breaks, and deleted rows together before saving.
- Reset reloads the saved planning and removes unsaved changes. It is not a general Undo function for things already saved.
- A shift marked for deletion may remain crossed out in the workspace. This allows you to see what is pending. If the removal was not intended, you can reset before saving, but other pending changes will also be lost.
- If the page shows an error, you need to read the message and check the planning before continuing. Part of the saving may already have been completed even if a later step fails. Therefore, do not assume the error has undone everything, and do not use repeated save attempts instead of investigating the result.
Drag an employee to an unstaffed shift or allowed position to staff it. If the shift already has an employee, Timeplan asks whether the new person should take over.
- Read who already has the shift and who will replace them.
- Check that all work tasks and times in the shift suit the new employee.
- Choose Yes only if the replacement is intended, or No to leave the existing assignment as is. The change applies to the entire shift row, even if it contains multiple time intervals.
- Review the changed workspace and save when the entire change is complete.
The employee must be able to work all work tasks included in the shift, and the times are checked against other shifts. Also check absence and negative work requests yourself: an employee under Unavailable can still be dragged to a shift. That a replacement is possible is therefore not a confirmation that all staffing conflicts are resolved.
The Shift dialog is used when a time interval in a shift needs review or change. Select the interval on the timeline without dragging it to open the dialog.
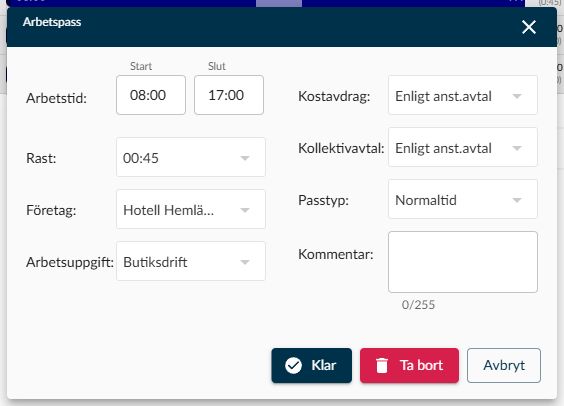
Image 3. The dialog shows an unstaffed shift with a manually chosen break length. The values belong to the open time interval; Choose Done to return them to the workspace, while the page’s Save is used to implement the planning change.
When the shift comes from a need template, the header instead shows Shift - Need template shift. You review the interval’s times and other choices in the same way, but Remove is not available in that dialog. The need behind the shift should therefore not be confused with a regular extra shift.
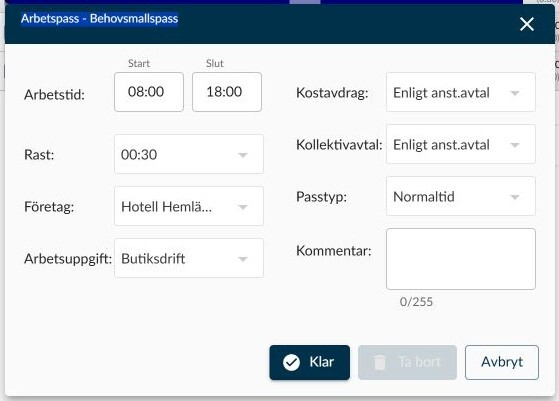
Image 4. The example shows an unstaffed need template shift on 14 May. You can review the fields, but the dimmed Remove button shows the interval cannot be deleted from here.
- Verify you have opened the correct day and interval. A change here affects the day’s planning, not the common shift template.
- Review Working time, Break, Company, Work task, and the contract choices applicable to the interval.
- Choose Done to return the change to the workspace. Choose Cancel to leave the dialog without applying the current change.
- Check times, breaks, and staffing in the workspace. Choose the page’s Save when the overall planning is complete.
- Working time contains Start and End. An end time equal to or earlier than the start time refers to the next day. Check especially night shifts. Overlapping or invalid times prevent using Done.
- The interval must be long enough for the chosen break and at least ten minutes or the longer time step you use. Do not try to resolve a break that does not fit by extending the shift if the new times do not correspond to the work.
- Under Break, According to employment contract means the break is calculated according to contract rules. The option No break, if present in your list, expresses an explicit choice of zero break. This is not the same as letting the contract determine the break. Other break lengths also come from your settings. When you revert to contract-calculated break, adjacent intervals in the same shift row also get that choice.
- When you change Company, the first available work task there is selected. Always check Work task after changing company. Changing work task also changes the interval’s colour.
- Meal deduction is shown when the function is enabled. According to employment contract follows the contract, while Yes and No are special choices for the shift. A changed meal deduction also carries over to directly adjacent intervals in the same shift row.
- Under Collective agreement, According to employment contract follows the employee’s applicable agreement. If you select a specific collective agreement, Change only collective agreement in exceptional cases is displayed. The choice can alter the calculation for the shift without changing the employee’s employment contract.
- Shift type offers active types. An inactive type already present on the interval may remain with the addition (Inactive). This does not mean it should be chosen for new shifts. The choice classifies this specific interval; it does not change the shared shift type settings on the Shift types page.
- Use Comment to explain anything relevant to just this interval. The comment can then be read in the information box over the shift.
- Remove in the dialog applies to the open interval, not automatically the whole shift row. The function is not available for need template shifts or a read-only row.
- If a pay period is locked in any company included in the shift row, the interval’s controls become read-only. Read the information but do not try to bypass the lock with a different choice.
- An existing interval retains its previous choices when the dialog opens, including explicit No or No break. Do not assume contract choices reset just because you open the dialog again.
- Done updates the workspace and break calculation there, but the planning is still unsaved. Cancel leaves the dialog changes unapplied; earlier unsaved changes in the workspace remain.
- Copy shift is used when a similar shift placement is needed. Check both target placement and staffing after copying so that an extra shift is not mistaken for a move of the old one.
- Remove employee from shift makes the shift unstaffed. The shift remains and still needs staffing if the need persists.
- Remove shift applies to the shift itself. The row is displayed crossed out while removal awaits in the workspace.
- Removal can be blocked on a shift from a need template. Removing the employee first is not the same as removing the need behind the shift.
Print first uses the page’s save flow and then opens the day’s report. If saving fails, investigate the issue before trying to print again.
- Review unsaved changes before choosing the function. Printing is not a way to view planning without affecting pending changes.
- Check that the correct date and work tasks are selected. You are working with today’s selection, not automatically all work tasks in the company.
- The absence display on the page does not necessarily transfer to the report. Do not assume a hidden absence shift is also hidden in print.
- Weekly overview shows planning over multiple days. Day Overview is for working more closely with times and breaks for one day at a time.
- Shifts contains the templates that can be added. A change to a template can affect other future shifts and should not be used for an exception applying only to one day.
- Base schedule and Advanced base schedule provide recurring planning. When a shift is changed manually, be aware it may differ from the base schedule pattern.
- Need templates describe the staffing need. On the Need template overview page, the need is assigned to dates, and the day link there can open Day Overview for you to follow the result.
- The employee’s Employment contract, collective agreement, and the shift’s own choices affect access, breaks, and calculation. Start with the correct information and date when something does not match.
Check the date and the selected work tasks. Then deselect Only available to investigate if the employee appears under Unavailable. Read the symbol information, for example Already scheduled, and check absence, other shifts, and work requests. Showing the person in the list does not remove a barrier to assigning the shift.
The crossed-out row shows a pending removal. Choose Save when you want the removal to be carried out, or Reset to reload the saved planning again. Note that Reset also removes other unsaved changes in the workspace.
Start by checking the break and which shift types are included in the planned time. Then check the work task selection, absence display, and whether a shift row contains multiple work tasks. The total may include time from such a full row even when part of the row lies outside your selection. Do not compare the total directly with visible clock times.
The shift belongs to a staffing need placed from a need template. Investigate the connection in the Need template overview and assess if the need should be changed there. Do not remove other shifts or employees just to try to remove the need row.